今回はWinUI 3アプリケーションに追加したデータグリッドに含まれるデータをグループ化して表示する方法ついてお届けします。
前回の記事ではWinUI 3アプリケーションにWindows Community Toolkitに含まれているDataGridの列ヘッダをカスタマイズして表示するように設定しました。
本記事では、DataGridに表示されているデータをグループ化して表示するようにカスタマイズしていきたいと思います。
表示するデータ
今回使用するデータソースは、以下のCustomerクラスで定義されたユーザー情報を例として使用します。
public class Customer
{
    public int Id { get; set; }
    public string LastName { get; set; }
    public string FirstName { get; set; }
    public string Address { get; set; }
    public string PostalCode { get; set; }
    public string CompanyName { get; set; }
    public string Department { get; set; }

    public Customer(int id, string firstName, string lastName, string address, string postalcode, string companyName, string department)
    {
        this.Id = id;
        this.FirstName = firstName;
        this.LastName = lastName;
        this.Address = address;
        this.PostalCode = postalcode;
        this.CompanyName = companyName;
        this.Department = department;
    }
}
そして実際のデータとして以下のリストを用意します。
public List<Customer> Customers()
{
return new List<Customer>()
{
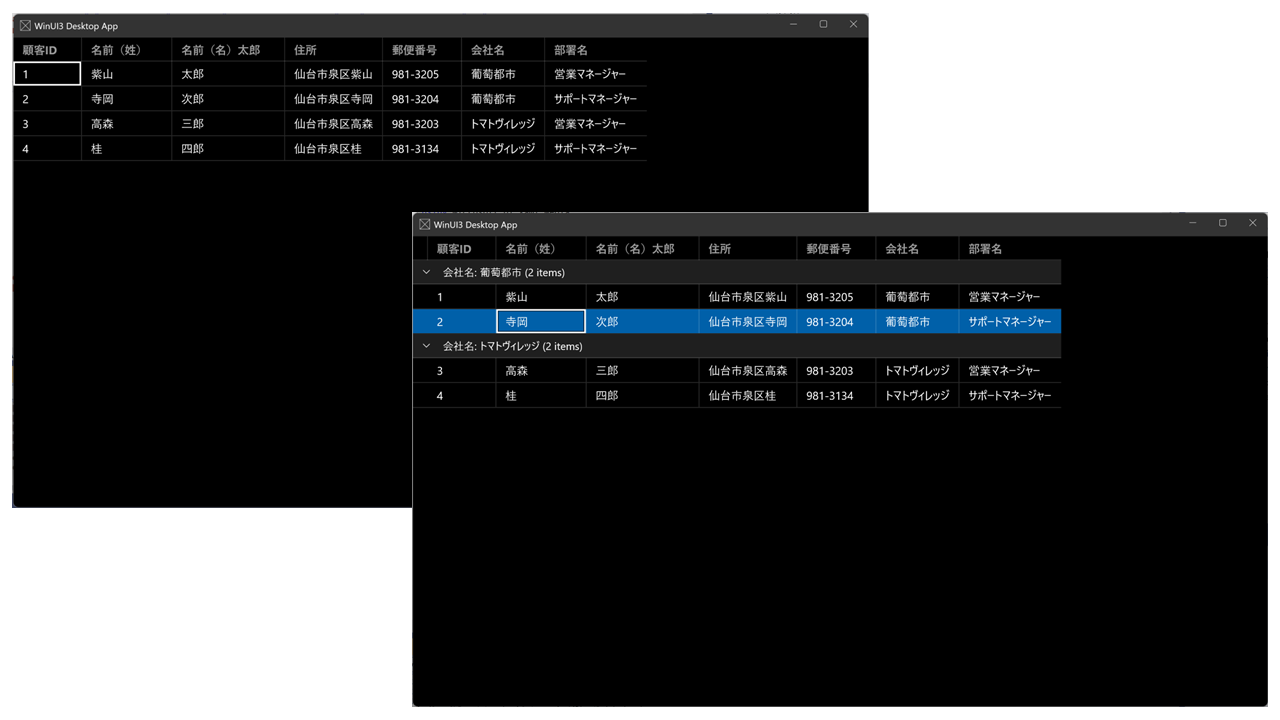
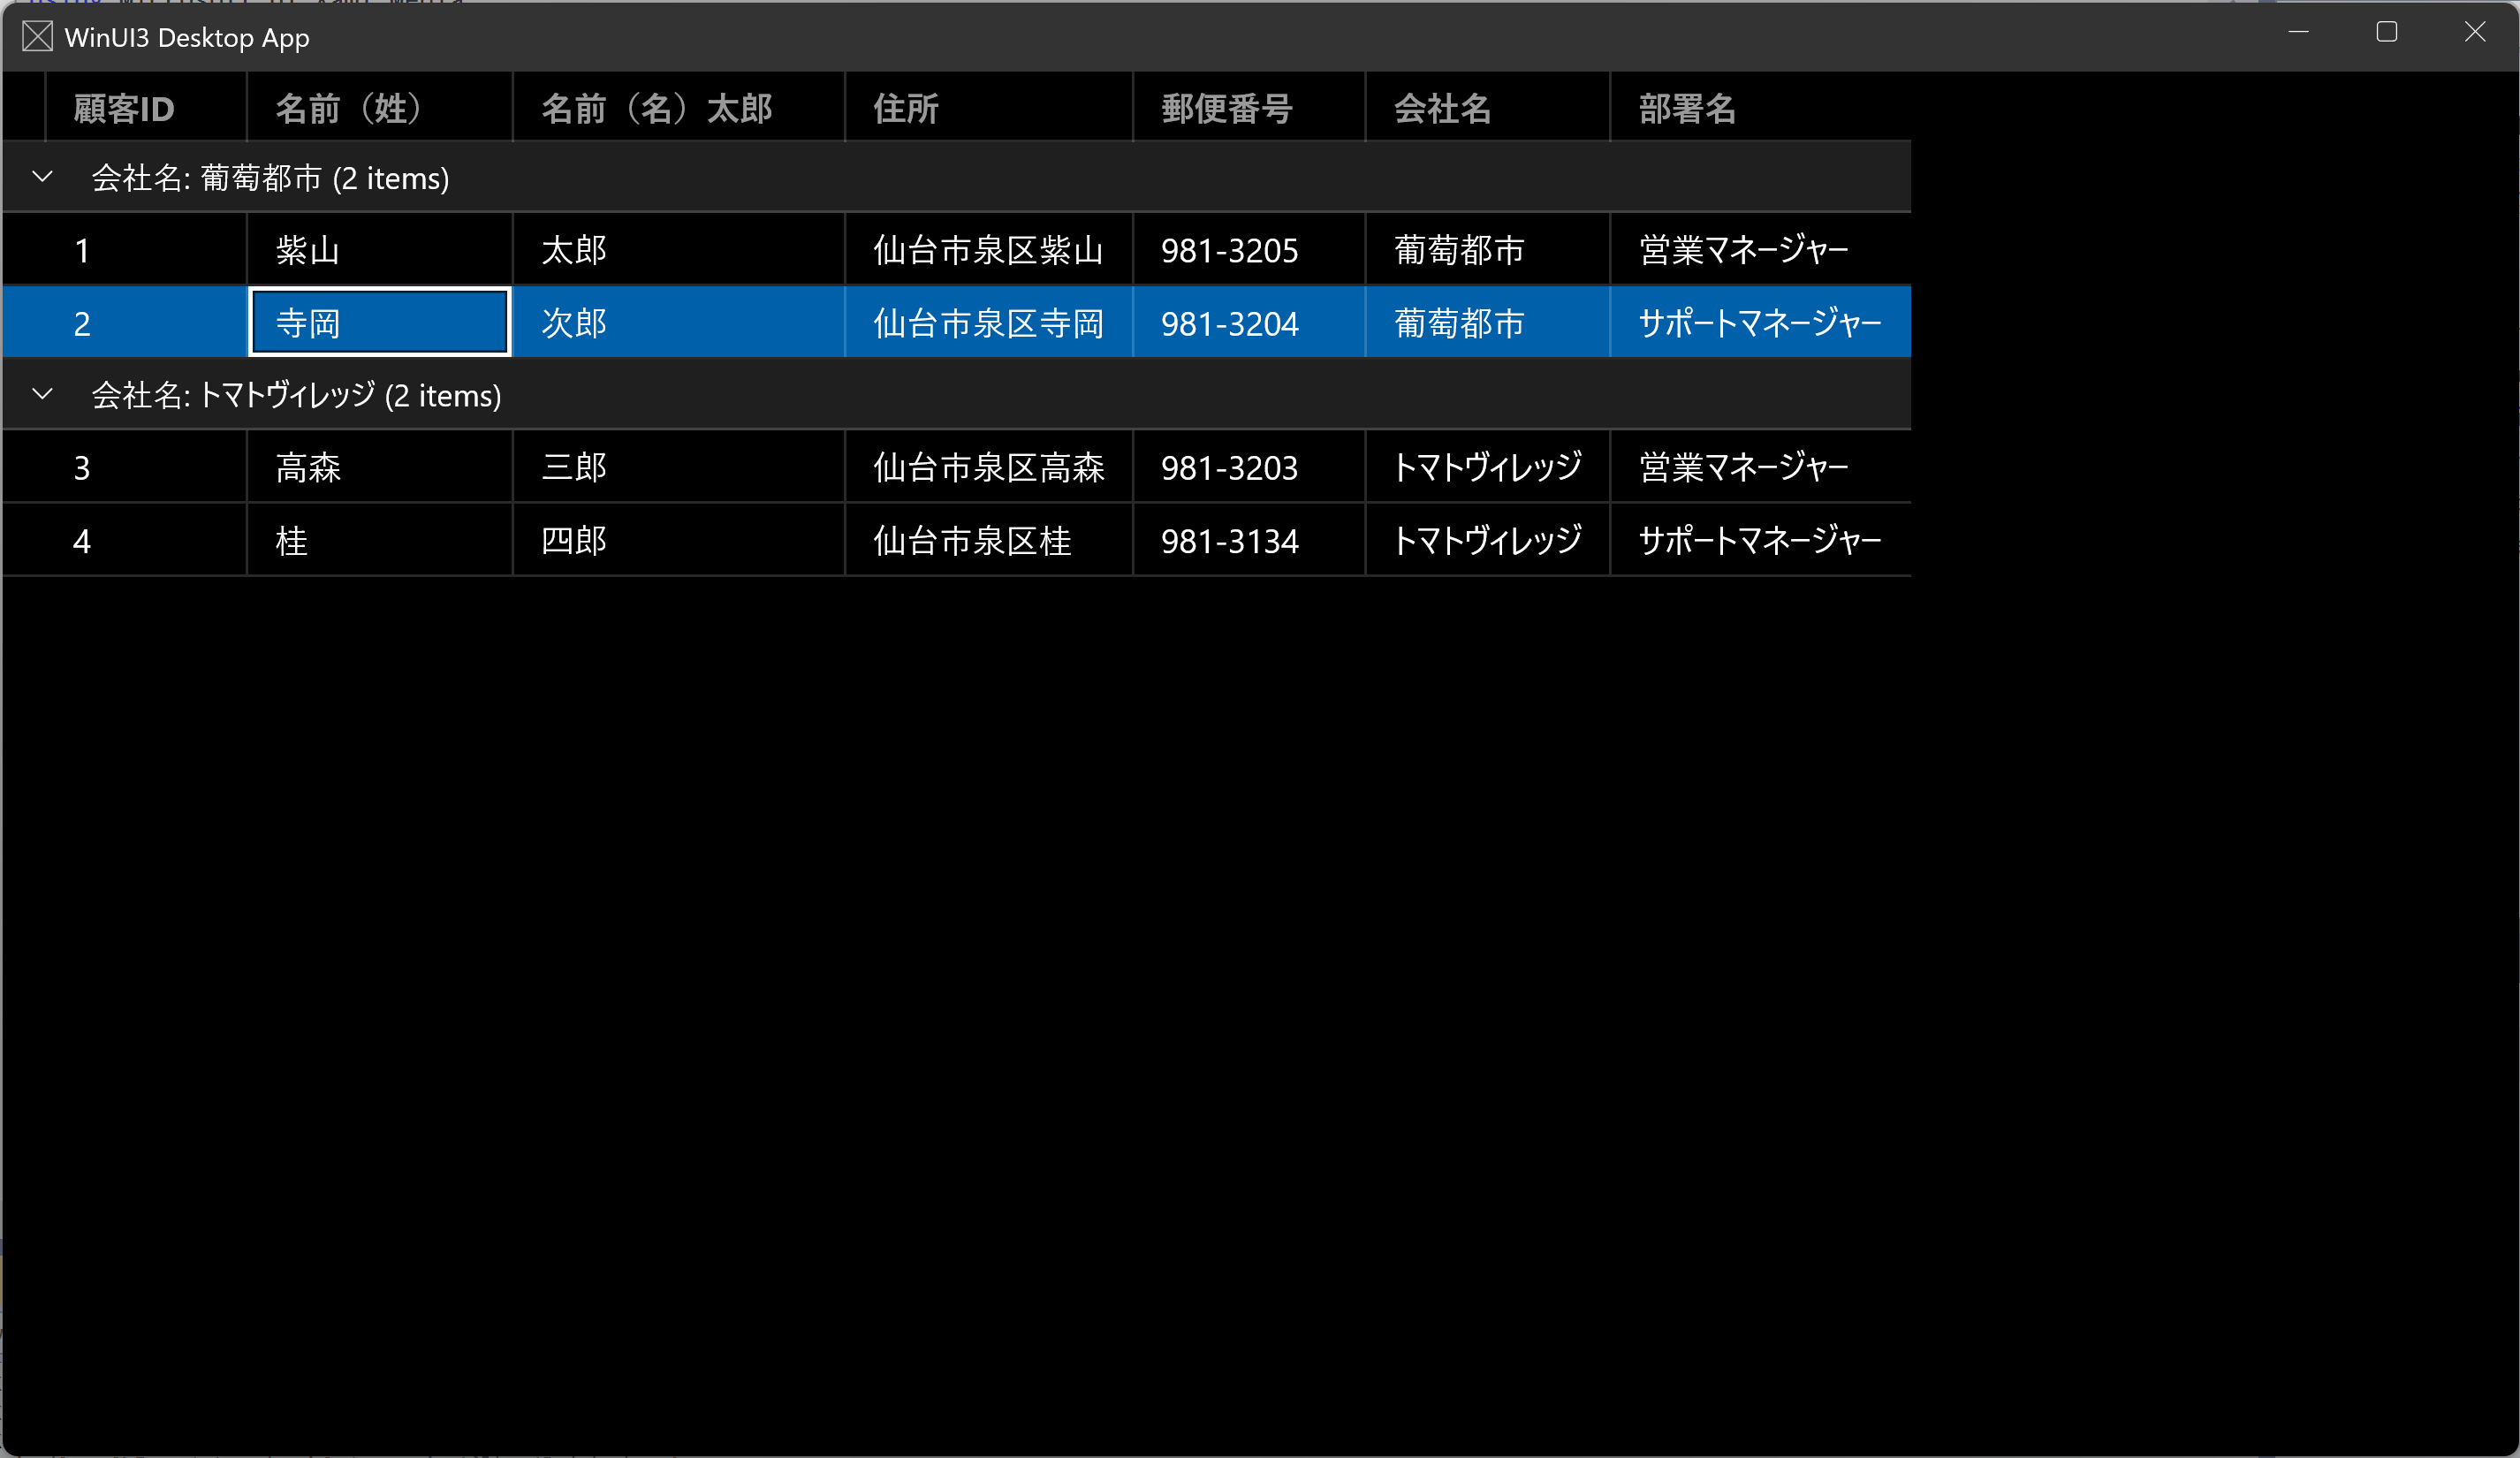
new Customer(1, "紫山", "太郎", "仙台市泉区紫山", "981-3205", "葡萄都市", "営業マネージャー"),
new Customer(2, "寺岡", "次郎", "仙台市泉区寺岡", "981-3204", "葡萄都市", "サポートマネージャー"),
new Customer(3, "高森", "三郎", "仙台市泉区高森", "981-3203" , "トマトヴィレッジ", "営業マネージャー"),
new Customer(4, "桂", "四郎", "仙台市泉区桂", "981-3134" , "トマトヴィレッジ", "サポートマネージャー")
};
}グループ化はこのデータに含まれる「会社名(CompanyName)」で設定するようにします。
データをグループ化する
以下のドキュメントを参考に、会社名(CompanyName)でデータをグループ化したコレクションgroupsを作成します。その後、groupedItemsのSourceプロパティにこのgroupsを設定し、IsSourceGroupedプロパティをtrueに設定します。
How to: Group, sort and filter data in the DataGrid Control
public CollectionViewSource GroupedCustomers()
{
    ObservableCollection<GroupInfoCollection<Customer>> groups = new();

    var query = from item in Customers()
                group item by item.CompanyName into g
                select new { GroupName = g.Key, Items = g };

    foreach (var g in query)
    {
        GroupInfoCollection<Customer> info = new GroupInfoCollection<Customer>();
        info.Key = g.GroupName;
        foreach (var item in g.Items)
        {
            info.Add(item);
        }

        groups.Add(info);
    }

    CollectionViewSource groupedItems = new()
    {
        IsSourceGrouped = true,
        Source = groups
    };

    return groupedItems;
}

public class GroupInfoCollection<T> : ObservableCollection<T>
{
    public object Key { get; set; }

    public new IEnumerator<T> GetEnumerator()
    {
        return base.GetEnumerator();
    }
}
データグリッドへデータソースを設定
上記のコードで作成したgroupedItemsを、DataGridのItemSourceプロパティに設定します。
public MainWindow()
{
    this.InitializeComponent();

    WinUI3DataGrid.ItemsSource = customerViewModel.GroupedCustomers().View;

}
グループヘッダを設定
グループ化したデータ表示する際のヘッダ(グループヘッダ)を設定します。データグリッドにLoadingRowGroupイベントとRowGroupHeaderPropertyNameAlternativeプロパティを追加します。RowGroupHeaderPropertyNameAlternativeで設定した文字列「会社名」はグループヘッダで表示されます。
<controls:DataGrid
    x:Name="WinUI3DataGrid"
    LoadingRowGroup="WinUI3DataGrid_LoadingRowGroup"
    RowGroupHeaderPropertyNameAlternative="会社名">
</controls:DataGrid>
private void WinUI3DataGrid_LoadingRowGroup(object sender, DataGridRowGroupHeaderEventArgs e)
{
ICollectionViewGroup group = e.RowGroupHeader.CollectionViewGroup;
Customer item = group.GroupItems[0] as Customer;
e.RowGroupHeader.PropertyValue = item.CompanyName;
}これで、グループヘッダの設定は完了です。アプリケーションをビルドして実行すると、以下のようにデータグリッドでデータが会社名(CompanyName)でグループ化された状態で表示できるようになります。
今回紹介したDataGridにおけるデータのグループ化を実装しているサンプルはこちらです。
DataGridの内容から話は逸れますが、今回のサンプルではWinUI 3アプリケーションのタイトルバーをダークモードに対応するようにカスタマイズしています。
XAMLで以下のようなタイトルバーで使用するコンテンツAppTitleBarを作成し、
<Grid x:Name="AppTitleBar">
    <Image Source="Assets/StoreLogo.png"
        HorizontalAlignment="Left"
        Width="16" Height="16"
        Margin="8,0"/>
    <TextBlock x:Name="AppTitleTextBlock" Text="WinUI3 Desktop App"
        TextWrapping="NoWrap"
        Style="{StaticResource CaptionTextBlockStyle}"
        VerticalAlignment="Center"
        Margin="28,0,0,0"/>
</Grid>そして、ExtendsContentIntoTitleBarプロパティをtrueに設定してSetTitleBarプロパティでXAMLで作成したAppTitleBarを設定します。
public MainWindow()
{
    this.InitializeComponent();

    ExtendsContentIntoTitleBar = true;
    SetTitleBar(AppTitleBar);
    :
    :
}